Tools and materials
Home ► Electronics ► Tools and materials
This page documents the various tools and materials I use. This is a reference, not a shopping list per se, each guide will link to this page for the items used in that process.
Hardware
Laminator
Some household laminators will do, just be sure it supports the extra thickness of a circuit board and possibly cardboard to help it along. I got a generic A3 laminator from AliExpress which has a temperature setting and adjustable springs. It has no brand name, but if you search for "A3 laminator" it's the one that looks like this:

Printer
Many people use a laser printer, but the ones I had did not deposit enough toner to work all that well. For an inkjet printer the best results are achieved with inks based on pigments instead of dyes.
The printer I use is a Canon PIXMA iP7250, which is not all that expensive. For any Canon use the official "PGI" range or cartridges, as these are pigment based. With these I do not need to double up on transparencies to get great results.
UV light source
I started out with a UV nail polish dryer which was ok, but the timer function could only do 120 seconds. Instead I built a little UV exposure box using an array of 5mm UV LEDs, 12 x 12 spaced about 1 cm apart. These are controlled through a MOSFET by an ATMega328, hooked up to a 16x2 character LCD and a rotary encoder. The time can be set, as well as the intensity (using PWM). I may one day post the code, schematics and 3D printable enclosure.
UV LED strips will probably make for an easier build, and you can replace the bare ATMega328 with an Arduino just as easily, but I liked the challenge. The LEDs have turned out to be very effective, reducing the exposure time significantly.
Whatever you use make sure you have enough control over the light source so that you can experiment and get good repeatable results.
Microscope
A very valuable tool for checking the results of your exposure and etching, and can also help with SMD soldering.
I started out with a simple USB microscope. You can find these on eBay or AliExpress and cost around 20 euros. They are basically cheap webcams, but are surprisingly effective. They come with an LED ring light as well. You don't need to use the software they come with, just open up the Camera application if you have Windows 10 or any other tool which can connect to a standard webcam.
For a bit of an upgrade, both in image quality and being able to use it standalone, I got the Andonstar ADSM302, which I would highly recommend if you're willing to spend a bit more.
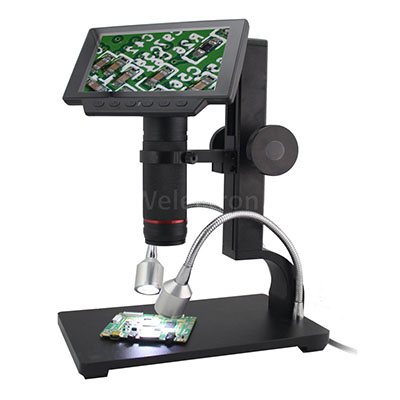
I purchased mine at Welectron: https://www.welectron.com/Andonstar-ADSM302-Digital-Microscope
Consumables
Transparencies
Use transparencies designed for your printer type. The ones I use are Esselte 57161.
Circuit board
I don't use boards with a presensitized photoresist layer, so any plain single or double sided board will do. Don't get the cheap cardboard ones though. Be aware that the process is different with the presensitized boards (positive vs negative exposure, different chemicals), so don't follow my guide if you want to etch those.
Adding the film yourself is a bit of extra work, but allows you to retry if the exposure fails. Replacing the film is a lot cheaper than wasting copper.
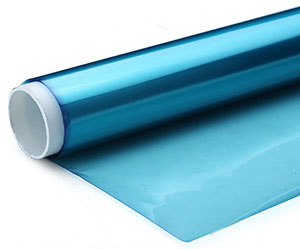
Photosensitive film
Search eBay for "photosensitive dry film PCB". The rolls are blue and typically come in 30cm x 5m.
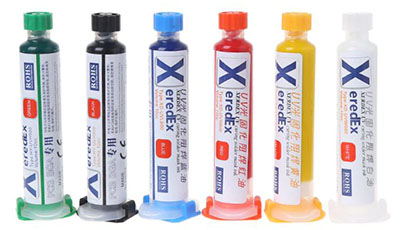
UV curable solder mask
UV curable paint which can be used to create a solder mask. The set I got comes in little syringe tubes in various colours and were ordered from AliExpress, search for "UV solder mask".
Chemicals
Note: I forgot most of my chemistry lessons, so any chemist will probably yell at me for getting the mixes all wrong. They are not accurate by a long stretch. They are however good enough to work well for my purpose.
Sodium metasilicate
Used to develop the photosensitive film. The recommended solution is 4,8%.
Purchased as a 37% solution:
https://www.deoplosmiddelspecialist.nl/kopen/natriumsilicaat-glaswater
Added 100 ml of the sodium metasilicate solution to 750 ml of demineralised water.
Ferric chloride
Used to do the actual etching. You can get it in solid form and dilute it yourself, but since I don't use that much I just get it premixed to 40% in 1 liter bottles, which can be used straight up:
https://www.deoplosmiddelspecialist.nl/kopen/Ijzerchloride-40-1L
Sodium hydroxide
Used to remove the remaining photosensitive film after etching. The recommended solution is 1%.
Purchased as a 10% solution:
https://www.deoplosmiddelspecialist.nl/kopen/Natronloog10
Added 100 ml of the sodium hydroxide solution to 900 ml of demineralised water.